We previously saw the general concepts around Quickly and more particular its core.
So, now, it's time to dive into the different commands of the first Quickly template which is ubuntu-project.
What brings me ubuntu-project template?
To make programming easy and fun, we've made some opinionated[1] choices about what tools, apis, etc.. to use.
In a nutshell:
- Python for the language
- pygtk for the UI framework
- Glade for the UI editor
- Gedit for the code editor (though this is easy for you to change if you choose another one)
- bzr for version control
- Launchpad for code hosting
- desktopcouch for storage/database (!)
ubuntu-project template adds some glue there to all those technologies to lower the barrel and facilitate the learning curve.
create command
The first command you will certainly use is to create an ubuntu-project "templated" project. You can just execute the following line to get a working project directory:
quickly create ubuntu-project Myproject
This causes a bunch of info to be dumped to the command line, but ends with the application being run. What Quickly does is to copy over basically a sample application, and do some text switcheroos to customize the application with the name provided.
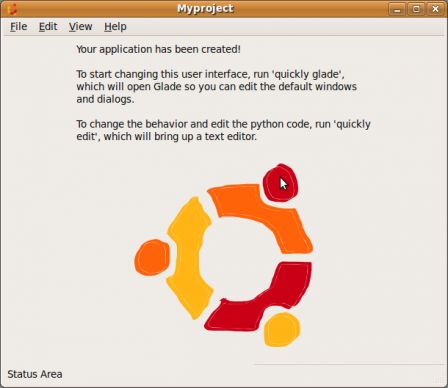
Here is the obligatory screenshot of a newly created Quickly application without any change:
Note that in addition to the main dialog, you get a preferences and also an about dialog.
Under the hood, the command initiate a bzr repository and make a first commit to your project, this will enable you to track your changes and revert them later if needed, sharing the code on Launchpad, and so on... So, here it is, your project uses all previously described technology and is under revision control. You also have a nice .desktop file for showing your application in desktop menus for free. Enjoy! \o/
Then, we considerate that all subsequent commands will be run from a ubuntu-project "templated" project folder.
run command
If you've closed the application and want to run it again, change to your project directory, and use:
$ quickly run
This will run your project as a subprocess.
tutorial command
This command gives you the definitive must-have tutorial to know, indicating you what to do once your project is created, what can be changed, how to build it, etc. It goes also in some desktopcouch-db tweaking.
$ quickly tutorial
It will launch your default web browser and point you to a bunch of documentation to realize a successful ubuntu application.
Note that you can launch this command outside any project[2] too by spawning:
$ quickly tutorial ubuntu-project
or:
$ quickly -t ubuntu-project tutorial
That's enough for today. It was rather short, but you have now plenty of stuff to discover by yourself: you can now create your own project and play with it. We won't cover here what lines to change into the default code of your project or how to add new couchdb storage as all of this is already described in the tutorial. We will rather focus on commands.
Next stop will be on how to edit/change the content of your software, and save your stuff at regular interval.
Notes
[1] very opinionated would say Rick Spencer ;)
[2] just a quick reminder for those who didn’t follow previous parts ;)
